Thursday, February 21, 2008

Multiseat in Ubuntu 8.04 (II)

<< step (I) <<

Once we have modified the xorg.conf file and we have a big desktop in the two monitors, the next thing is to configure gdm to launch the two Xephyr sessions.

Previously, you will need to obtain the information related to the input events on your system. The way of referencing the events has been recently modified. Now, the operating system allows you to access the events via their paths, and on some systems, via their names. The script wrapper to launch Xephyr it is now simpler compared to the previous version. It is not necessary any more to match the events with the physical locations (as we did through /proc/bus/input/devices)

You must obtain the path-based symbolic links to the events corresponding to your keyboards and mouses. In our particular case, whe have two USB keyboards, one USB mouse and one PS/2 mouse.


# ls -la /dev/input/by-path/ | grep event | grep kbd
lrwxrwxrwx 1 root root 9 2008-02-20 09:49 pci-0000:00:1d.2-usb-0:1:1.0-event-kbd -> ../event5
lrwxrwxrwx 1 root root 9 2008-02-20 09:49 pci-0000:00:1d.2-usb-0:2:1.0-event-kbd -> ../event6

# ls -la /dev/input/by-path/ | grep event | grep mouse
lrwxrwxrwx 1 root root 9 2008-02-20 09:49 pci-0000:00:1d.3-usb-0:1:1.0-event-mouse -> ../event8
lrwxrwxrwx 1 root root 9 2008-02-20 09:49 platform-i8042-serio-1-event-mouse -> ../event2


The invocation of the Xephyr wrapper in the (/etc/gdm/gdm.conf) file will be something like this (remember to do a backup of your files before doing any modification!):


# ****************************************************************************

# Modificaciones multiseat (20080109)

0=Xephyr0
1=Xephyr1
2=Xephyr2

[server-Xephyr0]
name=Xephyr0
command=/usr/bin/X -br -dpms -s 0
handled=false
flexible=false

[server-Xephyr1]
name=Xephyr1
command=/usr/sbin/Xephyr-path.sh -display :0 -br -xauthority /var/lib/gdm/:0.Xauth -screen 1280x1024 -kbdpath pci-0000:00:1d.2-usb-0:2:1.0-event-kbd -mousepath platform-i8042-serio-1-event-mouse
handled=true
flexible=false

[server-Xephyr2]
name=Xephyr2
command=/usr/sbin/Xephyr-path.sh -display :0 -br -xauthority /var/lib/gdm/:0.Xauth -screen 1280x1024+1280+0 -kbdpath pci-0000:00:1d.2-usb-0:1:1.0-event-kbd -mousepath pci-0000:00:1d.3-usb-0:1:1.0-event-mouse
handled=true
flexible=false

# ****************************************************************************


Notice that the Xepyr wrapper is called Xephyr-path.sh (just to remark the modification). If you prefer to reference the devices by its name instead of the path, obtain the names in a similar way (have a look at /dev/input/by-name/) and do the necessary modifications on the wrapper.

Since the previous version, xserver-xephyr has been modified so the script is slightly different from the old one. Place the script somewhere in your computer (and remember to give it execution permissions) so it can be invoked when gdm starts. In our prototype, the wrapper is placed at /usr/sbin/Xephyr-path.sh


#!/bin/bash

# 20080109..20080221 - josean
# http://netpatia.blogspot.com/

trap "" usr1

XEPHYR=/usr/bin/Xephyr

args=()

while [ ! -z "$1" ]; do
if [[ "$1" == "-xauthority" ]]; then
shift
if [ ! -z "$1" ]; then
export XAUTHORITY="$1"
fi
elif [[ "$1" == "-display" ]]; then
shift
if [ ! -z "$1" ]; then
export DISPLAY="$1"
fi
elif [[ "$1" == "-kbdpath" ]]; then
shift
if [ ! -z "$1" ]; then
args=("${args[@]}" "-keybd")
args=("${args[@]}" "evdev,,device=/dev/input/by-path/$1,xkbrules=xorg,xkbmodel=evdev,xkblayout=es")
fi
elif [[ "$1" == "-mousepath" ]]; then
shift
if [ ! -z "$1" ]; then
args=("${args[@]}" "-mouse")
args=("${args[@]}" "evdev,,device=/dev/input/by-path/$1,WHEELRelativeAxisButtons 6 7")
fi
else
args=("${args[@]}" "$1")
echo "+++ args $1 +++" >> /tmp/logXephyr
fi
shift
done

echo $XEPHYR -ac "${args[@]}" >> /tmp/logXephyr
exec $XEPHYR -ac "${args[@]}"


Notice the changes, mainly in the options passed to the evdev driver for mouse and keyboard.

Another significant change on the wrapper script is the removal of the line...

elif ! expr match $1 'vt[0-9][0-9]*' >/dev/null; then

...from the 6.06 version. Now, the parameters related to virtual terminals are not filtered, so they are passed in the final invocation. In our prototype, the two seats share the same vt (vt9) and this seems to be no problem at all. If you have more seats or you experience some problem, maybe you will need to filter the vt parameters in the final Xephyr call.

Currently, the mouse wheel (vertical scroll) is not working. The option WHEELRelativeAxisButtons is just to try to get it working, but without success at the moment. Unfortunately there is not much documentation about evdev and its options. If somebody achieves to manage the mouse wheel, feedback is welcome.

The good news is that the keyboard mapping seems to work properly. After dozens of trials with parameters (keyboard layouts, mapping, geometry), an updated package of xserver-xephyr was published some days ago. The new package corrected a bug in the path locations where evdev was looking for keyboard definition files. Now everything works perfect, you just have to choose the language layout for your keyboard (Spanish in our example).

If you test the system at this stage, you will probably see just only one login window. There is still a couple of things to do before your system is ready to use.

>> step (III) >>

Tuesday, February 19, 2008

Asus Eee PC: Hardware support in Ubuntu 8.04

Software tested: Ubuntu 8.04 alfa 4 + updates available on 20080219
Hardware environment: Asus Eee PC 4G (Black Galaxy)

Wifi:

The wifi chipset - Atheros AR2425 (AR5007EG) - is identified, and the propietary drivers are loaded.


Sadly, right now, wifi can not be used unless you install the appropriate patches. The dmesg command shows an error message: Hardware revision not supported, so the driver has not support for that piece of hardware.


394-[ 41.672159] ath_hal: module license 'Proprietary' taints kernel.
395-[ 41.802765] ath_hal: 0.9.18.0 (AR5210, AR5211, AR5212, RF5111, RF5112, RF2413, RF5413)
396-[ 42.159082] ACPI: Battery Slot [BAT0] (battery present)
397:[ 42.223421] wlan: 0.8.4.2 (0.9.3.3)
398-[ 42.450675] ath_pci: 0.9.4.5 (0.9.3.3)
399-[ 42.451801] ACPI: PCI Interrupt 0000:01:00.0[A] -> GSI 18 (level, low) -> IRQ 18
400-[ 42.451824] PCI: Setting latency timer of device 0000:01:00.0 to 64
401-[ 42.500081] wifi%d: unable to attach hardware: 'Hardware revision not supported' (HAL status 13)
402-[ 42.500114] ACPI: PCI interrupt for device 0000:01:00.0 disabled


Wired Ethernet:

Hardware on the Eee PC according to the original Xandros: Atheros Technology Corp. L2 100 Mbit Ethernet Adapter. Ubuntu 8.04 detects it as Attansic Technology Corp. L2 100 Mbit Ethernet Adapter and loads the correspondig drivers (atl2). The wired network seem to work properly. I have found just a small bug in the counter of the outbound traffic (always zero).

The original Xandros uses
Atheros(R) L2 Ethernet Network Driver - version 1.0.40.4

while Ubuntu uses
Attansic(R) L2 Ethernet Network Driver - version 1.0.40.2


As you can imagine Atheros and Attansic are just the same right now.

ACPI:
Suspend: You can suspend the computer (it takes a long time but finally it does suspend). When you restore, everything seems to be right. The only small detail is that the screen brightness does not maintain the previous settings. The screen brightness is set to max when you restore. You only have to adjust the brightness.

Power off: The live CD powers off properly. Once installed you have to press the power button for several seconds to power the computer off.

CPU frequency: Not tested

Audio:

It seems to work right. Some ocassional strange noises. Maybe not still 100% supported, but it works well enough to be usable without modifications.

Camera:

The video camera works out of the box. just be sure to have the camera enabled on the BIOS. The system loads the uvcvideo drivers and the camera is just ready to use.


Special buttons:
I have tested the suspend, Wifi on/off and brightness adjustment buttons. They work properly with no need for previous configuration.

Multiseat computer with Ubuntu 8.04

The goal of this guide is to achieve a multiseat (also called multiterminal) computer so that more than one user can work simultaneously with the computer.

Update (20090619): New tutorial for Multiseat in Ubuntu 9.04 available


In our particular case, we want to obtain a computer for two users, and as a constraint we want to use only one video card. Obviously the card will be a multihead one.

Our hardware can be considered as a low cost PC: The computer is equiped with a Pentium 4 at 3GHz, 512MB of RAM and a 80GB hard sisk. The video card is a Radeon X300 PCIe by ATI with two outputs (VGA and DVI). On the DVI output we have a DVI to VGA converter so we can connect two simple VGA monitors.

What to do step by step:

1.- Install the latest available version of Ubuntu 8.04 on your hard disk. We started the first prototype with the alfa 2 version and several of the problems that we encountered have been already fixed.

2.- After the installation do a package update to be sure that your system has the latest available packages.

One of the main changes in the multihead configuration is the use of xrandr. First of all you must plug the two monitors to your graphic card and obtain your configuration details. Read carefully the instructions of xrandr. The video out connections (VGA, DVI) are referenced with different names depending on your card manufacturer.


# xrandr -q
Screen 0: minimum 320 x 200, current 2560 x 1024, maximum 2560 x 1024
VGA-0 connected 1280x1024+0+0 (normal left inverted right x axis y axis) 337mm x 270mm
1280x1024 60.0*+ 75.0 59.9
1152x864 75.0
1024x768 75.1 70.1 60.0
832x624 74.6
800x600 72.2 75.0 60.3
640x480 75.0 72.8 60.0
720x400 70.1
DVI-0 connected 1280x1024+1280+0 (normal left inverted right x axis y axis) 337mm x 270mm
1280x1024 60.0*+ 75.0 59.9
1152x864 75.0
1024x768 75.1 70.1 60.0
832x624 74.6
800x600 72.2 75.0 60.3
640x480 75.0 72.8 60.0
720x400 70.1
S-video disconnected (normal left inverted right x axis y axis)


Once you have this information, you can modify your /etc/X11/xorg.conf file. It is very advisable to make a backup of the original (working) configuration file.

This is the xorg.conf for the prototype here presented:


# xorg.conf (X.Org X Window System server configuration file)

Section "Module"
Load "dri"
Load "drm"
Load "glx"
EndSection

Section "DRI"
Mode 0666
EndSection

Section "Extensions"
Option "Composite" "Enable"
EndSection

Section "InputDevice"
Identifier "Keyboard-base"
Driver "kbd"
# Option "Device" "/dev/null"
Option "XkbRules" "xorg"
Option "XkbModel" "evdev"
Option "XkbLayout" "es"
EndSection

Section "InputDevice"
Identifier "Mouse-base"
Driver "mouse"
Option "Device" "/dev/null"
EndSection

Section "Device"
Identifier "Card0"
BoardName "ATI Technologies Inc RV370 5B60 [Radeon X300 (PCIE)]"
Driver "ati"
BusID "PCI:1:0:0"
Option "Monitor-VGA-0" "Mon-VGA"
Option "Monitor-DVI-0" "Mon-DVI"
EndSection

Section "Monitor"
Identifier "Mon-VGA"
Option "DPMS"
EndSection

Section "Monitor"
Identifier "Mon-DVI"
Option "DPMS"
Option "RightOf" "Mon-VGA"
EndSection

Section "Screen"
Identifier "Screen-base"
Device "Card0"
Monitor "Mon-VGA"
DefaultDepth 24
Subsection "Display"
Depth 24
Modes "1280x1024" "1024x768"
Virtual 2560 1024
EndSubSection
EndSection

Section "ServerFlags"
# Even if mouse detection fails, X will start
Option "AllowMouseOpenFail" "yes"

# VT switching is disabled
Option "DontVTSwitch" "yes"

# X restart (Ctrl+Alt+Backspace) is disabled
Option "DontZap" "yes"
EndSection


The lines ...

Option "Monitor-VGA-0" "Mon-VGA"
Option "Monitor-DVI-0" "Mon-DVI"

... are to indicate which monitor is connected to each of the card video outputs.

You can eliminate some lines, such as those related to acceleration (dri, glx). As we will use Xephyr, the final result will not have 3D acceleration. In our case, that does not matter because the PC will be used on an office environment, mainly for administrative tasks.

The line ...

Virtual 2560 1024

... on the screen section is like a kind of bounding box containing the two monitor. As you can see, we have two 1280x1024 monitors in a side by side configuration.

If you restart the X system, you will have a big desktop across the two monitors.

Update (20080508): Comment out the "/dev/null" option in the mouse section. In the final configuration you will not need the base mouse anymore, but this line in this moment will let your desktop without mouse support.


Section "InputDevice"
Identifier "Mouse-base"
Driver "mouse"
-> Option "Device" "/dev/null"
EndSection


>> step II >>

Friday, February 15, 2008

Asus Eee PC: Install Ubuntu 8.04 on a USB stick

Ubuntu, the popular Linux distribution, is catching the attention of more and more people every day.

Many distributions today are available as live CD / DVD, so you can just test the new operating system with no modifications at all on your computer.

There are lots of tutorials and howtos on the web covering the topic of the installation, but our goal and the reason of this post is a bit different.

If you want to go ahead further than you can do just with a live distribution, then you will need to install the operating system on your computer. Maybe you want to start using the new system while maintaining the previous one, and I mean a full use (update packages, install applications, install additional drivers to test if your hardware is supported, and so on).

If you do not want to mess with your hard disk partitions and you only have one hard disk available (as laptop owners have), then you should consider to install the system on an external device.

Luckily we have today many options available such as USB disks, USB memory or even memory cards that can act as boot devices. Those devices are available today at cheap or moderated prices.

We have a laptop: The popular Asus Eee PC with its original operating System (a customized version of Xandros). We want to install Ubuntu (Ubuntu 8.04 alfa 4) on the laptop but we do not want to remove the original system. We will use a 8GB USB memory as the target device where new the operating system will be installed.

Prepare the media containing the live CD installation disk. You can download Ubuntu as an .iso file to be recorded on a CD (DVD). Alternatively you can extract the files from the .iso to a USB memory and make it bootable. This way you will have a live USB with your Ubuntu distribution. You can find tutorials with instructions to do this.

I used an USB with only one big partition of 1GB. Then I resized it to 720MB obtaining a second one of about 260MB. That can be a good idea if you plan to do some work (such as creating documents or downloading from the web) since the second partition will be available in read + write mode. In my first trial I used an additional SD card just to store the screenshots of this tutorial. With two partitions on the live USB you can avoid the need of a second storage device even if you want to take screenshots.

Plug your live USB and boot your computer. If you are doing this on the Eee PC, just press the Esc key in the first screen to choose which device to boot from. Wait until the live system is fully loaded and running.


Plug the target USB memory (where you are going to install the operating system). In this case I used one having 8GB, but the default install takes less than 2GB. I do recommend to use one having at least 4GB (you are going to need additional space for your files, to download package updates, to install additional applications, ...) or you will have almost no free space.

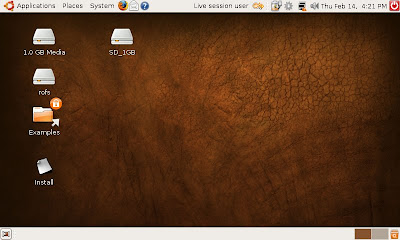
Click on the install icon.


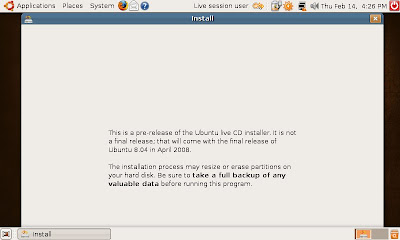
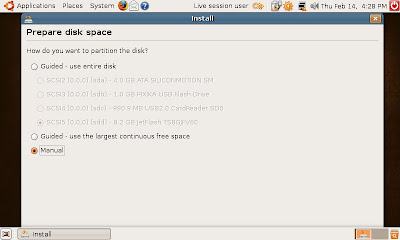
Choose your prefered language, your timezone and the keyboard layout. When asked to prepare disk space, choose to manually partition the disk.


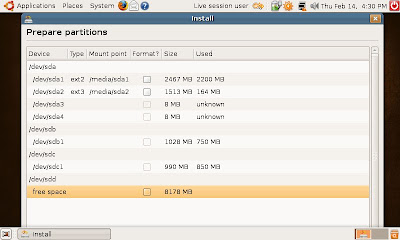
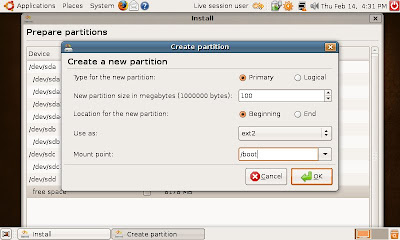
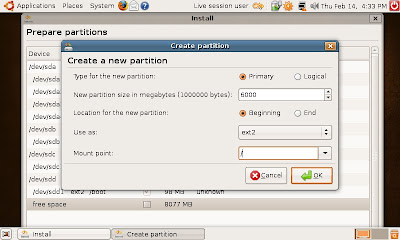
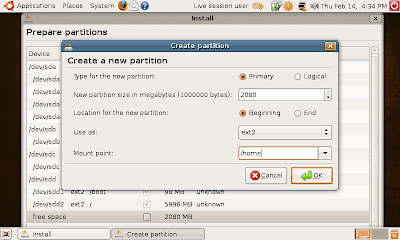
I do recommend to create partitions. This is an optional step and you can use the whole disk without partitions, but if you plan to update / upgrade your system it may be convenient to have separated partitions to mount the /boot and /home directories. Create the partitions on the desired media according to your preferences.


In particular, I have done three partitions: ~100MB (/boot), ~6GB (/), and ~2GB (/home)


Rmember to choose a filesystem without journaling (i.e. avoid using ext3). I have used ext2 on all filesystems.


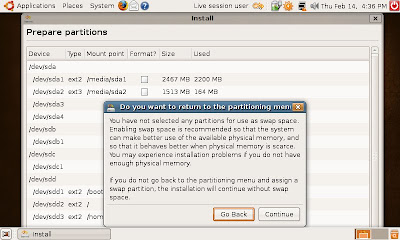
The system may present you some warnings about "incompatible features", "uncorrected errors" or lack of "swap partition". You can ignore these warning and follow to the next step.


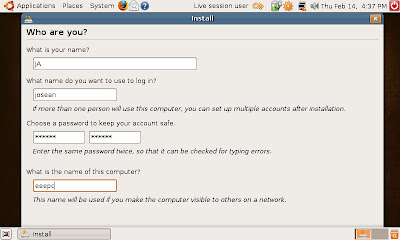
Then, you will be asked for some personal data to create your account on the system


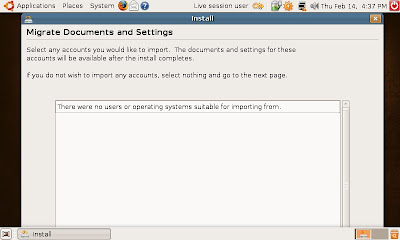
The system looks for previous data. It this is a first install it will find nothing to import.


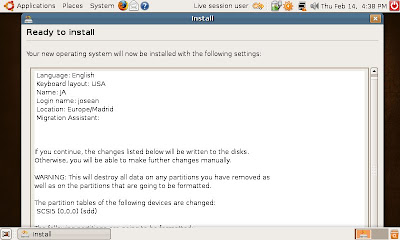
Ready to install. Be extremelly careful in this step. If you just choose to continue, the installer will modify the MBR of your main disk (the SSD containing the original Xandros or whatever you installed on your disk).


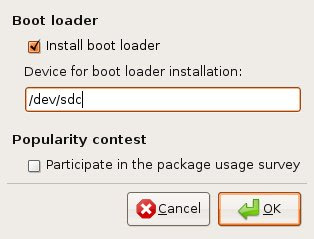
This is the lower part of the window, with the Advanced... button:


Choose the correct location (hd0) is the SSD, use the item corresponding to your media, such as: (hd1), /dev/sdc, or whatever else.


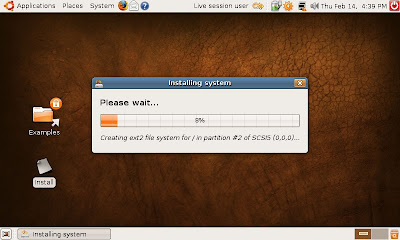
Once decided whether to use a boot manager and its location, the installation begins.


Be patient. Flash disks are not as fast as a clasical HD. The installation process will take a lot of time.

Before rebooting the system, check /boot/grub/menu.lst If your boot device is not the SSD the references to your device will be wrong. Replace (hd2,0) or (hd1,0) by (hd0,0). When you boot from the removable media, this media is seen as hd0 by the system.

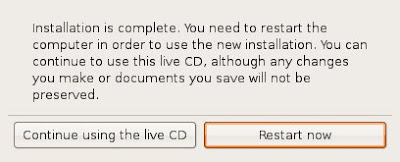
Once finished, you can finally boot on your newly installed device


Versión en español: Instalar Ubuntu 8.04 en una memoria USB

Wednesday, February 13, 2008

Video of Ubuntu 8.04 multiseat computer

At last, the prototye of the Ubuntu 8.04 multiseat computer is already running.

We started working on that prototype with the alfa 2 version, and currently it runs under the alfa 4 one. During this time many bugs have been fixed and what seemed impossible to achieve one month ago, is a working computer right now.

In this moment, we have a computer usable and apparently stable. Two people can use (share) simultaneously the computer, and this one uses only one graphic card (the same as we did in our first trial).


There are still some minor bugs and limitations, but we hope that things will keep improving in the two remaining months until the publication of the final release.