Monday, September 21, 2009

Flash Development on Linux (III): swc libraries

In this stage, we already know how to set up our Flash development environment on Linux, and how to compile basic programs in Flash (Actionscript).

If we intend to develop something a bit more advanced, it is very common to need precompiled libraries. These libraries are packaged in the form of .swc files, so we are going to know how to create such libraries, and how to use them once created.


The AXDT plugin form Eclipse includes a simplified version of the Flex SDK provided by Adobe. The SDK from Adobe includes additional tools, and in this scenario, in order to create a swc library, we need the component compiler (compc). This compiler can be found included with the Flex SDK tools.

The installation of such environment presents some minor difficulties that we are going to solve here:

First of all, we go to the Adobe website to download the open source Flex SDK. In this tutorial we have worked with the version 3.4.0.9271 (Aug 18, 2009)


$ sudo mkdir /opt/flex3

Then, we will choose an appropriate directory to unpack the compiler in such place. Notice the -a option: It is necessary in order to convert text files (CR/LF characters) properly.


$ sudo unzip -a -d /opt/flex3 flex_sdk_3.4.0.9271_mpl.zip

Optionally, you can remove the files on the bin directory intended for other platforms


$ sudo rm -f /opt/flex3/bin/*.exe /opt/flex3/bin/*.bat

Once uncompressed, we need to give the execution permissions to the files in the bin folder. The zip file definitely was created on a non-Linux system.


$ sudo chmod +x /opt/flex3/bin/*

To illustrate the usage of the component compiler, we are going to create the .swc library file corresponding to the Away3D library. Away3D is an open source flash 3D library which is quickly becoming one of the most popular Flash libraries on its field.

Once again, we download the source code of the library. Since we are developing for Flash 9, we download the 2.x version. If you intend to develop Flash 10 programs, you can go with the 3.x version. In our sample, we are working with the 2.4.0 version.

We create a directory for the library inside our workspace directory and uncompress there the away3D source code.


$ mkdir $HOME/workspace/away3d
$ unzip -a -d $HOME/workspace/away3d away3d_2_4_0.zip

The component compiler, apart from having a very limited documentation has a syntax a bit inconvenient. We can not indicate to the compiler to include all the classes under a directory tree, but we have to enumerate all the classes that we want to pack into the .swc file. In the case of the Away3D library, that means that the command line to invoke the compiler must contain the name of about 320 classes (including their package names).

To avoid that, we are going to create a compilation script in a more or less automated way. Since I am not an expert on shell scripts, suggestions on how to improve / ease this script are welcome.


$ cd $HOME/workspace/away3d
$ echo '/opt/flex3/bin/compc -compiler.source-path . -output ./away3d.swc -include-classes \' > compile_away3d
$ find . -name '*.as' | grep -v 'away3d/test' | sed -e 's/\.as/ \\/g' -e 's/\.\///g' -e 's/\//\./g' -e '$s/ \\//g' >> compile_away3d
$ chmod +x compile_away3d


The compile_away3d script file now has the command line necessary to compile the library, excluding the sample sources under the test directory. All we need to do right now is just to invoke the compilation script. Have a look inside it before if you are interested in a closer examination or do not worry about it if you just want to compile the library disregarding the details.


$ ./compile_away3d

Once in this step, if the compiler complains about a duplicate variable definition on the lensFlare.as file (line 118), everything is going right.

The as3 language manages the scope of the variables in a different manner than the usual one (as, for example in C++ or Java). Block scope does not exist, and the minimal scope for variables is the whole function. There is a bug related to that in the current latest stable version (2.4.0) of the Away3D library (the bug has already been corrected in the svn version), so we change a fragment of code in the lensFlare.as in order to avoid having a duplicate variable declaration. The change consists just in getting the variable declaration (ctVal) out of the conditions, and declare it just once.


if(useBurning && _burnClip)
{
var ctVal:Number;
if(_burnMethod == LensFlare.BURN_METHOD_BRIGHTNESS)
{
var bsVal:Number = 5*burnFactor/_projectionLength;
bsVal = bsVal < 1 ? 1 : bsVal;
bsVal = bsVal > 3 ? 3 : bsVal;
//TweenMax.to(_burnClip, 0, {colorMatrixFilter:{contrast:bsVal, brightness:bsVal}});
//TODO: setup colorMatrixFilter tween without TweenMax
ctVal = 500*burnFactor/_projectionLength;
_ct = new ColorTransform(1, 1, 1, 1, ctVal, ctVal, ctVal, 0);
_burnClip.transform.colorTransform = _ct;
}
else if(_burnMethod == LensFlare.BURN_METHOD_COLOR_TRANSFORM)
{
ctVal = 500*burnFactor/_projectionLength;
_ct = new ColorTransform(1, 1, 1, 1, ctVal, ctVal, ctVal, 0);
_burnClip.transform.colorTransform = _ct;
}
}


Now, the library compiles without any kind of problem. We will see the away3d.swc file (about 590KB size) on the current directory.

Wednesday, September 16, 2009

Flash development on Linux (II)

Once you have set up your Flash / Flex development environment on your Linux box, you are ready to compile your first application.

Open Eclipse with the AXDT perspective

Create your first project. This is done under the menu item File -> new -> AXDT project.... Give a name to your project and select a directory (usually under the directory that you chose as your workspace).


After the creation of the project, you can start to add your source files. The compiler supports both kind of files: as3 (ActionScript) as well as .mxml files. We are going to compile a sample from the AXDT site.

Go to the menu and choose File -> new -> AS3 file


Choose the folder to store the source file (usually src). Optionally you can organise your code in packages. Using packages is optional but becomes more necessary as you project grows. Better being used to manage packages from the beginning. The sources will be placed in a subdirectory tree structure according to the package structure. Finally, give a name to your source file: As in many other OOP languages, the file name must be the same as the name of the class defined in such source file.

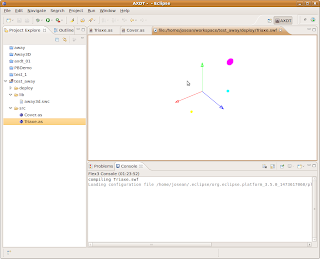
After the creation of the source file, write down (or copy + paste) the file contents. At this point, your environment should look more or less like this:


Once created and saved your source file, you can compile it. Just click on the menu item Run -> Run As -> Compile and Open a SWF File. You will see some options to configure the compiler but do not worry about such options right now. You can maintain the default values.


If everything has gone right, you will see your Flash application running on the Eclipse IDE . The swf file created will be placed on the target location (default is deploy), so you can copy such file and publish it on your website.

Tuesday, September 15, 2009

Flash development on Linux

Recently I am getting more and more interested in flash development. Since the adoption of actionscript 3 (as3) as programming language Flash is becoming more and more a serious option to develop applications

The main inconvenient that I find is the fact that the development tools are almost just available for the Windows environment. This is an operating system that I stopped using almost two years ago, and I do not have any intention to come back to such family of operating systems.

I am into free software, so I will try to do flash development based on open source tools as much as I can.

This is my development environment:
A four years old Pentium IV based computer, running a 32 bit version of Ubuntu 9.04

Eclipse (you will need to have Java -JRE- installed in order to run Eclipse)
AXDT: This is a set of plug-ins for the Eclipse platform that enables the user to write ActionScript3 code in such a framework.

We can start having a look at the installation instructions on the AXDT site.

The first step is to download the "Eclipse IDE for Java Developers". In our particular case, we will choose the 32bit Linux version (eclipse-java-galileo-linux-gtk.tar.gz)

Then we will have to uncompress that somewhere on our hard disk. We have chosen to install it on the /opt directory.


$ sudo tar -C /opt -xzf java-galileo-linux-gtk.tar.gz


After that, we launch the Eclipse application. First thing will be to choose the workspace directory. We can maintain the default option: just a directory called "workspace" under our home directory.

In the menu, we choose Help -> Install new software...

Click on the "Add..." button, and type the following:

Name: Eclipse IMP
Location: http://download.eclipse.org/technology/imp/updates/


On the lower right corner of the main Eclipse window, you will see an indicator. The program is getting a list of available software components. Some seconds after that, it will show you those components. Do not choose anyone in this moment, and continue to the next step.

Name: AXDT
Location: http://update.axdt.org/


Choose (at least) the following packages:
Axdt AS3 Feature
Flex3SDK Feature


Then click on the "Next >" button, accept the licence and proceed to install the AXDT + Flex SDK framework.

If the system complains about unsatisfied dependencies or requirements, be sure to have installed the basic packages of the Eclipse base environment. I have found in some installations that such repositories are not initially enabled.

Name: Galileo
Location: http://download.eclipse.org/releases/galileo

Name: Eclipse project
Location: http://download.eclipse.org/eclipse/updates/3.5

Once installed, restart Eclipse

Go to the menu: Window -> Open perspective -> Other... -> AXDT


You are now ready to start to develop Flash / Flex programs on your Linux box. You can find a simple example of how to compile your first Flash program on Linux.